Demanding Sanding

Spring/early summer of 2016, and I’ve been doing some sanding. OK, a LOT of sanding. But before I get into that, here are a few things Clare’s been up to while I kick up the dust.

When I mentioned to Clare that I thought we should make all the duplex electrical outlets (okay, receptacles!) into quads, she took it in stride and commenced to wiring up a storm. Now, there’s no way we’ll ever run out of places to plug things in (ha!). Then she took care of some more lighting fixtures. Installing lights over the doors makes the outside look even more finished:

Continue reading “Demanding Sanding”

DecksAnDrumsAndRockAndRoll

One of the (few) benefits of taking so long to build this house is that we’re able to save up a bit of cash along the way. We can use this to hire out some of the things that would take us forever to do ourselves, like the roof. It became clear that another one of these things would be the wraparound deck and porch. The deck is very important in that it will keep the rain off the first-floor cordwood walls. The large roof overhangs protect the walls higher up, but it’s a long way from the roof to the first floor.

We contacted our builder pal John Hamilton (he of roof-putting-up fame) and asked him to quote out the job. The quote looked good to us, so we asked when he could start. He had some time at the end of April; this was also a good time because he could beat the biting bugs (who deserve a good beating).

So, while we continued prepping logs and getting the house site cleaned up after winter, John and his merry men got to work. Their first task was to extend the interior floor joists to the outside using treated lumber, and nail a board (rim joist) across the ends:

Can I get a rim shot!?

Next, they laid down deck boards, fixed posts at the edge of the deck, and installed rails:

Yarrrh, matey, best not be goin' overboard

Here’s the nearly completed deck. Note that there are no posts holding it up, it’s all cantilevered out from the inside floor joists. Because of this, using synthetic decking was out of the question; it’s much heavier than the treated lumber we used, and the engineering gods said no way to that kind of extra weight:

I'm always railing against something...

The final (extensive) task was to build a screened-in porch under one of the rear roof overhangs. Clare had the idea to raise it a few feet off the ground and have one set of stairs going from the back of the house to the porch, then from the porch to the deck. John and his crew did a great job helping us figure out the details, then making it happen:

Try and get us now, ya wee flyin' vampires!

Now we have a really sharp-looking place to eat lunch and get out of the sun and bugs, and it won’t always be blowing over like last year’s tent.

We anticipate spending a lot of time here

Woohoo! Here come some early (for us in the frozen wastes) spring flowers. Marsh marigold in the vernal streams:

Your rich uncle died - and left you all his marsh marigolds

And wild strawberries everywhere else:

Strawberry surprise? Or The Apples in Stereo?

The strawberries they produce are tasty, but no bigger than a blueberry.

Look out! It’s a tarp!

Once again, we’re way behind updating this site, so I’m typing this in June 2009 but dating it November 2008. With winter breathing down our necks (should’ve worn scarves), one of the tasks was to tarp over the empty bays between the posts to keep as much snow as possible out of the house. If there’s one thing we’ve accumulated on this house project, it’s tarps, tarps, tarps:

Under the sea, under the sea...

Here’s the outside after the first floor was done, and after a bit o’ white stuff fell:

May all your Thanksgivings be white

Another vital task was to brace the house a little bit better, since we were counting on the rigidity of the cordwood infill to help resist racking – particularly with a heavy load of snow on the roof. Since there is precious little cordwood infill, we put up a couple of large diagonal braces on the first and second floors (you can see the second floor braces above, in the first and fourth bays). These will come down next year when we finish cordwooding the outside wall.

In addition, the row of posts & beams holding up the roof in the back of the house needed permanent bracing, since they are outside the house and won’t be cordwooded:

Gravity vs. Engineering - Who Will Win!?

In addition, we cut up a few more logs. Since we hope to be able to work on the house next winter, this may be our last guilt-free goof-off season until we move in. Here comes winter!

They call him Old Man Winter. Pretty tough old man. Like, Clint Eastwood tough.

I’m gonna raise the roof, I’m gonna carry on

give me an old trombone, give me an old baton…

Nerdwood welcomes you

We’re building most of this house ourselves; just the two of us with lots of advice and the occasional helping hand. We are contracting out a few steps, though, one of which is the roof. Not only is it a bit too high for us, it would take forever for two inexperienced people to do what needed to be done. John Hamilton and his crew of merry men finished the roof on July 17, 2008. It took them just under a week and a half; here’s how it all came down. First, they put up the rafters:

They'd make a heck of a raft

Those are sixteen-inch high I-joists, which are made from scrap wood (just like OSB sheathing) and can be made to order to surprisingly long lengths. Ours were forty-four feet long; the crew cut them down to just under forty feet for the main part of the roof and used the rest for the overhang in front. Next up was to put up the decking and fascia boards:

Bloody fascias!

They actually laid down a layer of decking, then ran two-by-fours above the joists and laid a second layer of decking on top of that. This allows us to fill the entire sixteen-inch cavity above the ceiling with insulation, and the space between the two layers of decking will provide ventilation to keep the roof cool in summer and prevent ice forming in the winter.

After the decking, they put up felt paper and the metal roofing panels. We went with a white roof, which will help keep the house cooler in the summer. As you can see from the first photo, the top of the roof itself is not really visible due to the shape. This is true from almost every vantage point. Here’s a vantage point I’m unlikely to “enjoy” on a regular basis:

This is the highest I've been yet!

This is standing on the peak of the roof looking down across the front overhang.

The final bits were the soffit (the underside of the roof) and the fascia covering (sides of the roof). The soffit was a bit tricky for the crew since they had to wrap it around the many angles of the post-and-beam structure.

No critters getting in here!

The crew said it was the largest soffit they had ever built; this was due to the large areas of overhang in the back since it’s a square roof over a semicircular building. Finally, they brought it all together by finishing the fascia and related trim:

Go ahead. Rain all you want.

Whew! Now the frame will stay dry and we can work under cover from the sun and rain. We have a few more details to build before we start cordwooding, but these should only take a week or so. Here’s a gratuitous vantage point looking northeast from the house:

That's what I love to see

And a visitor to the house:

Please eat some bugs, fella!

My old frame

Time to wrap up the final framing details.

The big ones

The picture above is of the rear roof supports. The house is sort of semicircular and the roof is a big sloping square, so this line of posts and beams catch the bottom of the roof. The corners are large areas of overhang, suitable for firewood storage, rainwater catchment tanks, and a screened porch (eventually). As it turned out, the brackets we used to tie the posts to the concrete piers we had poured were a bit larger that I had envisioned, so we had to rout out mortises on all four sides of each post bottom to get the brackets to bite into solid concrete:

That's one Shimmy Disc you got there, Kramer!

Some of the concrete piers weren’t exactly level, either, so a number of hardwood shims were in order, as you can see. At some point we’ll cover the brackets somehow in order to prettify the base. These posts and beams are eight-by-eight; overkill from an engineering standpoint, but just right aesthetically.

Once done with this, the next (final) phase of the framing was to provide support for the front roof overhang. In the front of the house, the roof sticks out about four feet, so angly bits and beams were in order.

How's it hangin?

Since these were twenty feet above ground and sticking out over three feet from the house, you can bet I was wearing a fall-protection harness clipped to the frame!

So now the frame is done. Hurray! We celebrated with a glass of ice wine from Canada. The frame ended up taking six months of working nights and weekends, as well as a week or two of vacation and holidays. Longer than I expected, but if we hadn’t had a fifteen-inch circular saw to make the cuts, we’d still be on the first floor! Next up, the roof. But first, summer flowers abound, both planted:

Sweet, sweet william

and wild:

Not that I'd push daisies on anyone

Back on the Frame, Gang!

Spring is sproingy. Pincherry:

Mmmm...cherries with pins. Tasty pins!

And green, green, yello fields:

Claro que si!

So now back to the framing. We had hoped to finish the framing and have the roof on by May 15 so we could maximize our cordwooding window this year. Because we are using a pure lime mortar (no portland cement, just lime, sand and water), we have to be sure the temperature won’t dip below freezing for thirty days after we lay up a wall. Unfortunately, due to a number of factors including a cold, wet spring, and gross miscalculation of the amount of time needed to complete the framing, it looks like July is a more realistic estimate of when we’ll start stacking logs.

The roof style is a shed roof, so it starts low(er) in the back and reaches it’s peak at the front of the house. Thus, we have to finish building up the front:

I'll never be a skyscraper builder

Front’s done:

The Towering Edifice!

The top level was by far the trickiest part – lots of funny compound angles to cut (yeah, a real laff riot!) and fit. They say “Measure twice, cut once,” but for this part it was more like “Measure twice, check the drawings, mentally rotate the pieces in three dimensions, measure a few more times, double-check the angles, cut, test-fit the pieces on the ground, then hoist them into place.”

Good thing I had that squangle

Finally, finished with the main house part of the framing. You can really see the roof angle here:

it's looking housy!

Note the screened tent in front. The bugs in late May and all of June are brutal, and this year was spectacular, first with hordes of hungry black flies then mosquitos that seemed unfazed by swatting – they would just shake off even a direct hit and get back to the annoyance business. At least this year we had a tent we could take a break in and taunt the lil’ vampires.

The BOLD winter

Well, we hoped to get the roof up before the snow fell. Here’s how it went:

We got to work on the center section of the second floor. This is comprised of eight-by-eight posts and beams and holds up the roof where it passes over the middle of the house. We used the Little Lifter to hoist pallets of timbers up to the second floor, then we set them in place by hand. The two beams on either end stick out over three feet past the outside wall, to provide a wide roof overhang. Because these beams were so heavy, we set them into place with the crane. This was fun, not unlike those games in the arcade where you try to grab fabulous prizes (i.e., disappointing junk) with the claw. Except those prizes won’t kill you if you drop them on your head. For the most part. I’m wearing the orange “please don’t shoot me, I’m neither a deer nor a partridge” hat, manipulating the crane with a little control box:

So far, so good

Wheeeee!!!

Almost there... Allmosssst therrrre...

Once it’s really close, Clare gets up there with a two-by-four to help the beam into place:

Clare:

Of course, after all that work, it’s a good idea to drive into Tapiola and get some pie at The Feed Mill:

No funny comment here - pie is no joke

The pictures above were all taken around Thanksgiving. As you can see, very little snow, in fact it all melted Saturday after Thanksgiving. I finished cutting timbers for the top level and stacked them in the house Sunday afternoon.

The next evening, Monday evening, the snow started. It stopped for a few hours here and there, but pretty much continued all week. The following Saturday, December 1st, Richard Brooks and I went to rescue his truck – in the winter, it’s his plow truck, and we had at least three feet of snow for him to use it on. Here’s how the house looked one week after the pictures above:

Honey, could you shovel the bedroom?

We went skiing that same day – over a month and half earlier than last winter. Granted, it’s not unusual to have lots of snow by December 1st here in “Big snow country,” but it really did hit all at once and has not let up since.

Unfortunately, I think those timbers I cut are going to have to wait until spring, as will the roofer. A bit of a disappointment, but I don’t see how we could have worked on the house more and still kept our jobs. Since we can’t cordwood until there’s no chance of frost, which is May 15 around here, I think we can still start cordwooding on time next year. We just might not have as many logs stacked as we had planned. Still, it sure is pretty around here:

Snowflakes keep fallin' on my house...

Farewell Horizontal

We’re in the middle of framing the second floor now, hoping the weather continues to play nice. The posts and beams we’ve used so far for the second floor have been brought up the old fashioned way – with two people, a few muscles and a couple of (quickly tired) backs. This will change soon (more on that later). After the first day of framing (posting? No, wait – that’s what I’m doing right now), we had four posts up:

Make the pie higher!

One of the many time-consuming tasks before we could put up the posts was to put the deck joists in place. You can see them in the photo above sticking out of the side of the house under the new posts. These will hold up the second-floor deck on the front and sides of the house. We eventually need to put up three more sets in between each of the ones you see here, but these particular ones had to go up now since they are holding up the posts above them.

Besides the fun of having a deck, it serves the purposes of protecting the first-floor cordwood walls from direct weather and shading the first-floor windows from the high summer sun. In the winter, the sun is low enough in the sky to get in and heat up the first floor slab.

We continued with the front posts and beams until we finished a week or so later. At that point, we had to put up two massive (six-by-twelve, thirteen foot long) beams that go over the living room. Since these were way too heavy to lift ourselves, we asked Richard Brooks (inventor of the Lizard, see past post) if we could rent his crane truck:

Not so little to me

This truck is another of his inventions, the “Little Lifter.” Richard and I hoisted the big beams into place in about half an hour – not only a time-saver, but a back-saver as well. We’ll use the crane to hoist smaller timbers up to the second floor in twos and threes, then place them by hand. We’ll also use it to set some larger timbers that support the roof.

The pretty-good pumpkin rises

After a pumpkin break, we enjoyed “Sunset over Nerdwood:”

It's getting housy

A floor to some, a ceiling to others

Well, a month and a half have flown by, and we’ve been hard at work trying to achieve house altitude. The joists that hold up the second floor were the next order of business. We wanted them to be open from below, to add to the spaciousness of the first floor and to show off the planking that will serve as both first floor ceiling and second floor floor. Floor floor floor floor floor <ahem> Anyways, we found a guy who had some rough sawn two-by-twelves and two-by-fourteens in lengths up to nineteen feet that he never got around to using, and they worked out great for our joists.

More wood! More wood!

The only issue was it took forever to cut them to a uniform height and get them into place. Here are the joists in mid-place (mid-put? Nahh…):

Not much of a shelter yet!

Once in place and secured, we had to install flashing under where they exit the house, to keep rain from rotting away the ends of the joists and the beams they sit on. Again, this seemed to take forever. But they turned out well – here’s the view from the second floor:

Fall in the Upper Penninsula

And here’s the view from the first floor. Almost seems a shame to cover the view of the sky through the floor!

What a web we weave!

Our next task is to continue the post-n-beam structure upwards, building the second-floor walls. Once we’re done with that, the roofer will take over and we’ll have a skeletal frame with a roof overhead, ready for us to start cordwooding next spring.

The weather has been really crazy this year. From the beginning of July until the first week of September or so, we received almost no rain whatsoever. Terrible drought, complete with wildfires burning tens of thousands of acres here in the U.P. Since then, it has rained buckets, completely saturating the ground, washing out roads, and making it difficult to work outdoors. So, at this point, it’s a race against time and the elements to try to meet our goal for this year of a roof in place.

One nice effect of the rain was the magnificent crop of mushrooms that sprang up in mid-September:

Yes, they actually are magic!

These are very interesting toadstools, see this page for all the gory details of the amanita muscaria formosa.

Snappy & the Lizard

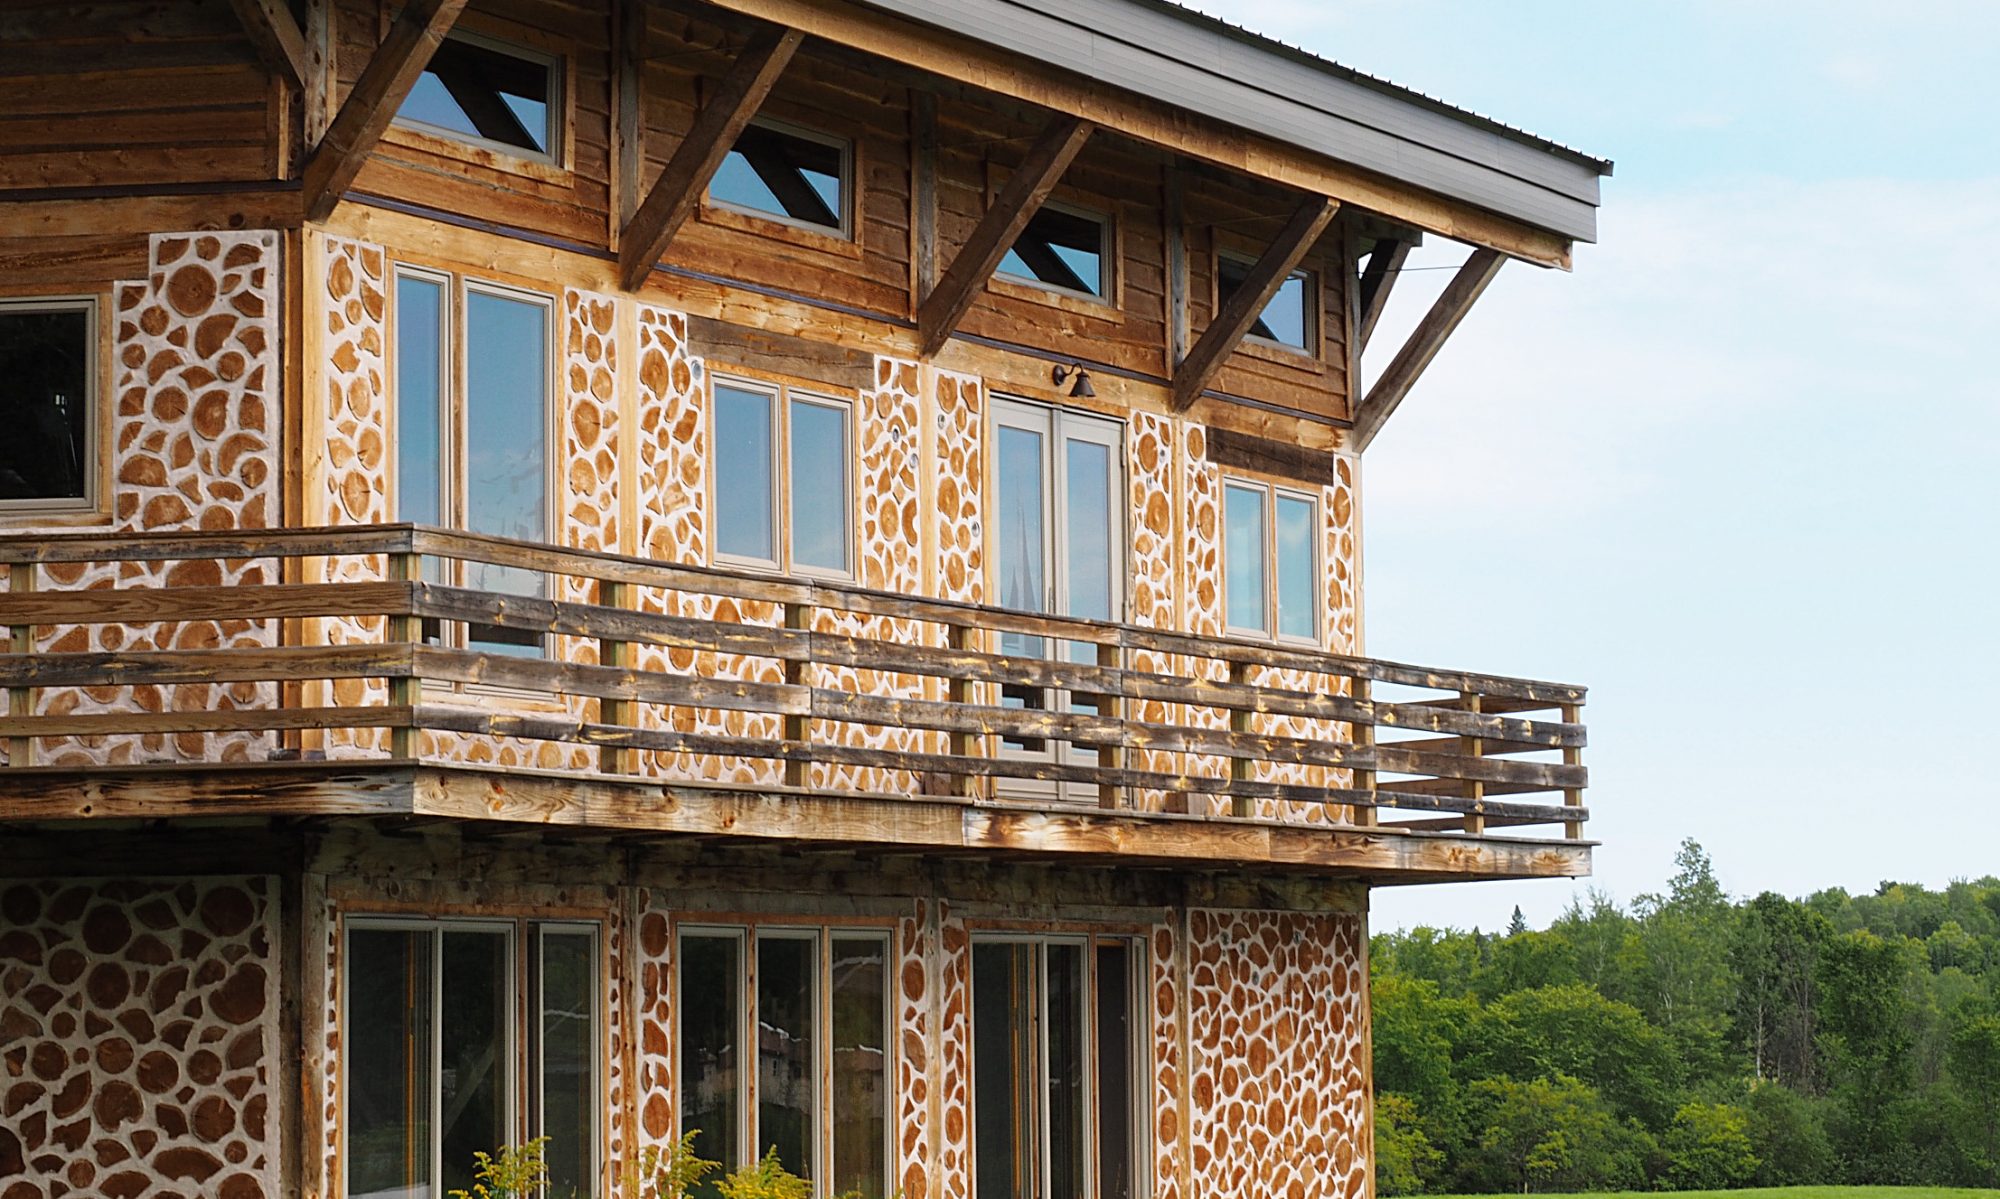
In mid-July, Mike from Frog Valley Woods delivered the first load of timbers, now nicely seasoned. We tried to design the house to use short lengths of timber, mostly 8- and 10-footers; all but two are 6 X 6 inch, 6 X 8 inch or 8 X 8 inch. These were all fairly easy for Mike and I to unload and stack next to the foundation, but for the 12- and 14-footers he brought an electric winch with a claw at the end, sort of like one of those carnival games. Except you wouldn’t break your foot if you dropped a stuffed animal on it.

Well, it's a start

The vertical posts are a bit tricky – we have to make sure they’re truly vertical both side-to-side and front-to-back (i.e., plumb). Then we have to brace them in both directions to make sure they don’t shift out of alignment. Still, after the first weekend, we had a row of them in place:

Like a row of Rory Calhouns

The full birch logs we planned to put in the center of the house were much more of a challenge, though. We had hoped Richard Brooks, a friend of Dave Bach, could lift them into place with an invention of his – a small crane mounted to a pickup truck. He asked me to calculate the weight of each one, and they came out to over a thousand pounds each! Well, no way could he lift them with his crane, and we didn’t want to have a big crane brought in at great expense and disruption to the house site. He did have some ideas of how to put them up, though, and he loaned us a rolling truck/dolly type thing to move the logs around on. The thing is low-slung with tall tires, and Clare started calling it “The Lizard” – see for yourself:

Pretty easy to catch this lizard

Once we used the Lizard to get the first log near the spot it was to end up on, Dave Bach (who also had some great advice) and I tied a rope to the top of the log, ran it through a pulley at the top of a tripod I built, and tied the other end to the ol’ pickup.

Pyramid Power!

Then, I backed up the truck and hoisted the log up:

Never did this in Driver's Ed

Finally, we move it into just the right position and let it down slowly.

Precision birchery

These pics are of the second log, which Clare, Matt and I raised on a lovely Saturday morning. After raising the first two, we decided against using four logs – it would have been overwhelming in a not-very-large room. So, these two will flank the masonry heater:

The Logs of Today

Then it was time to put some horizontal beams across the vertical posts. This went more quickly since we don’t have to brace them, just put them in place, make sure they’re level, and screw them down with gigantic timber screws. We borrowed a rolling scaffold from Dave to do this. He called it “Snappy,” which I thought was a bit odd since I hadn’t known Dave to name inanimate objects like Clare and I do. Upon closer inspection, though, I saw that Snappy was indeed the name of this model of scaffolding.
Woodhenge?

Finally we’re in the third dimension!