After spending the last couple of months cutting and cleaning logs, mixing lime putty, and tidying up the place, July 4 was Opening Day of our cordwood wall building season for the year.
One of the loose ends that had to be addressed was what we have been referring to as This Whole Front Door Situation. Greg installed a temporary front door. Of course “temporary” can end up meaning a pretty long time at Nerdwood!
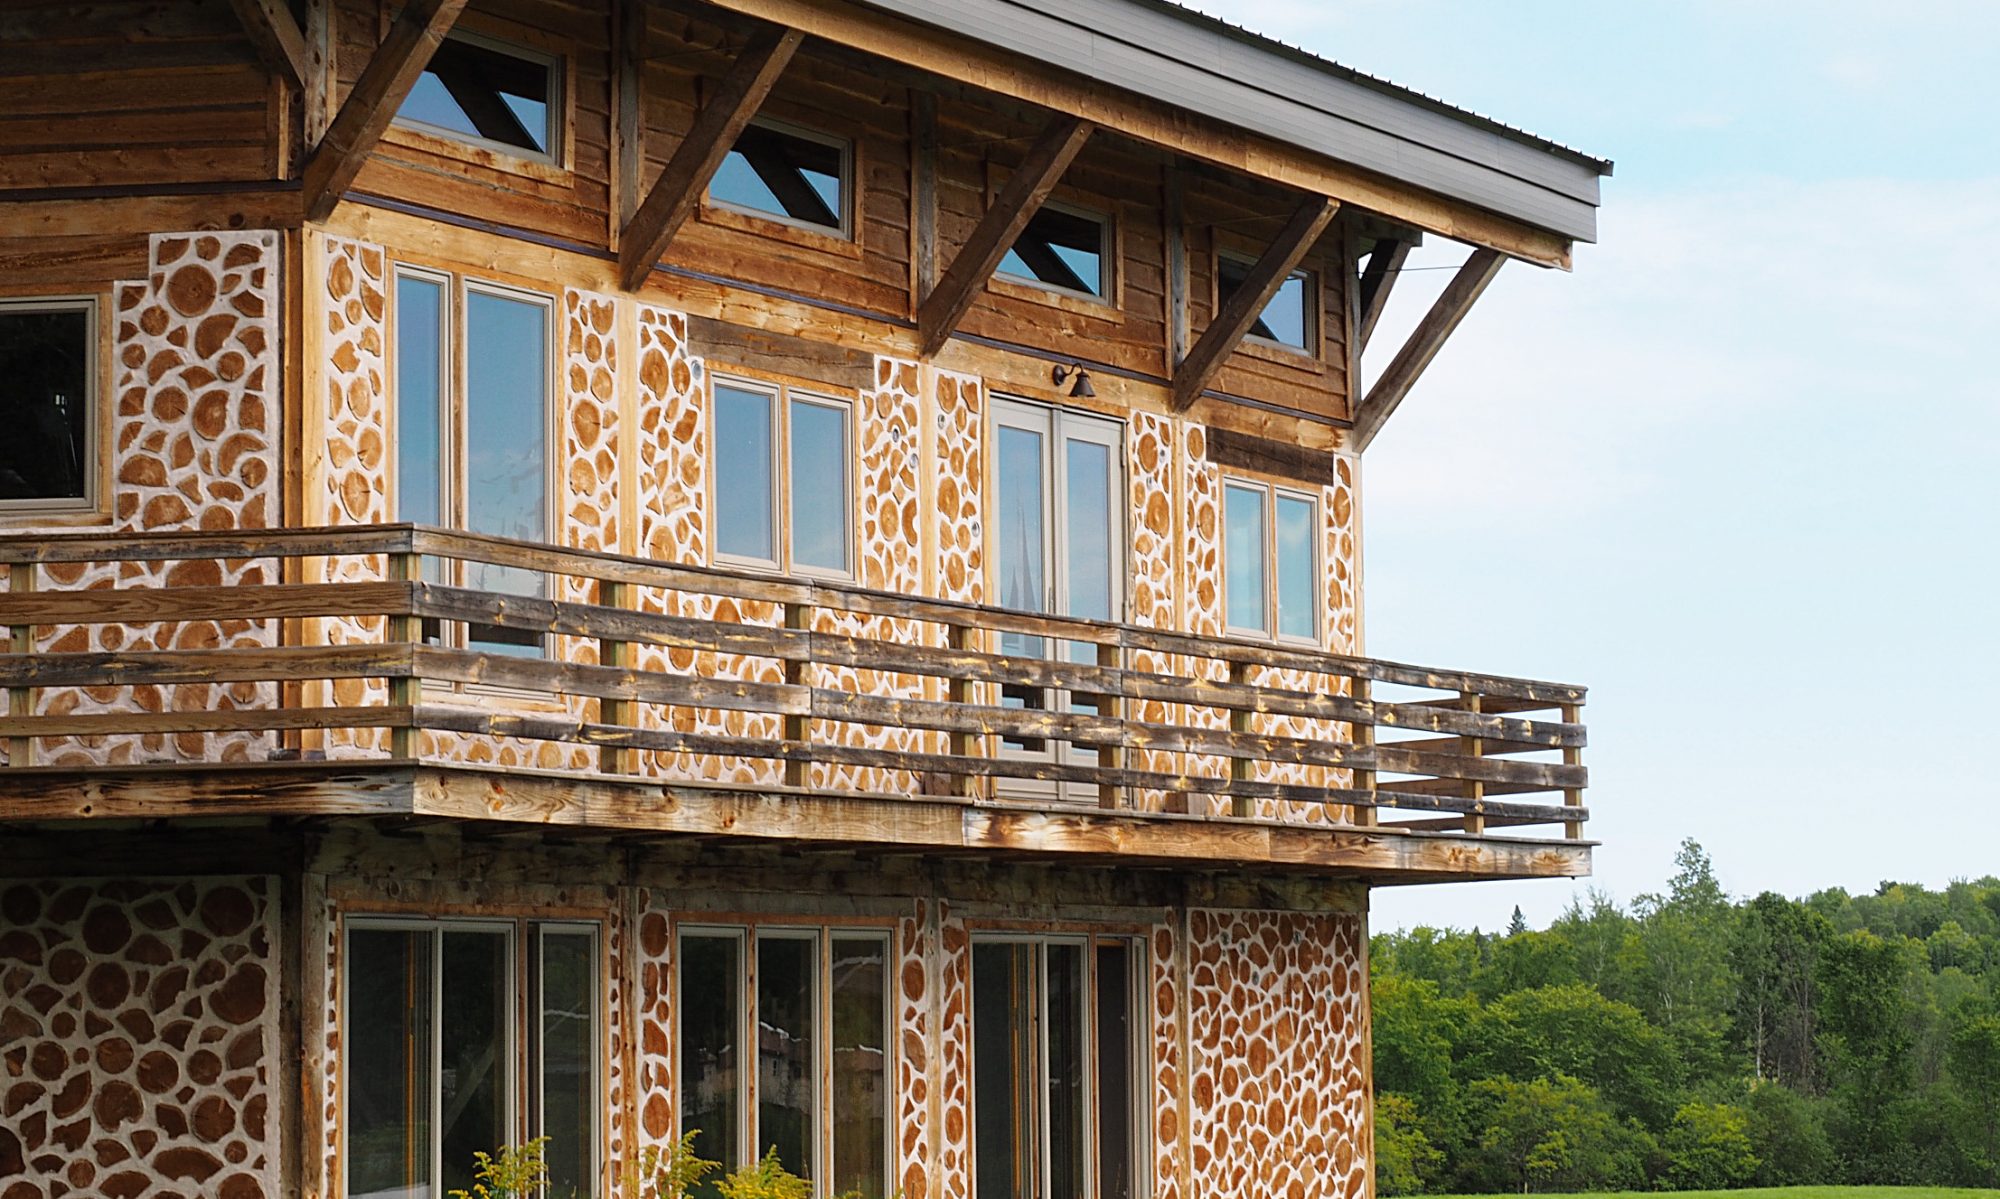
Greg fired up the mortar mixer, and after a couple of work days we have some very nice new walls in progress.
During the warmest March ever recorded in Michigan’ s Upper Peninsula, the snow melted unusually early. We used this opportunity to clean up several years worth of construction debris in preparation for the upcoming building season. Contractor bags and scrap lumber awaiting a trip to the transfer station are not very photogenic, so I will spare you the gory details.
For quite some time we have been scouring Craigslist and the local classifieds for a used tractor to help us keep up with all the chores and maintenance around the property, but nothing suitable ever came up. As luck would have it, one of my co-workers decided this spring to part with his compact tractor which was a bit over sized for his place in town, but is perfect for us novice tractor owners with acreage to tame.
The 1988 John Deere 855 came with a snow blower and a 60″ mowing deck. It can reach a blazing top speed of 11 mph. It’s not difficult to drive and handles surprisingly well. In fact, it’s a lot of fun! We should have a much easier time with many of our construction tasks now that we will not have to struggle with tall grasses and weeds all around the house.
Despite one’s best efforts at crafting a beautiful cordwood wall with a variety of contrasting yet harmonious shapes and and sizes of log ends, it is inevitable to end up with occasional large, ungainly mortar joint. At such times, custom dictates placing a stone or interesting object in the mortar to break up the awkward space.
Rocks collected from the beach are great for this purpose, but we’ve also been working in some handmade mosaic tiles, or as we’ve been referring to them, gewgaws. There are a number of very talented artisans selling these on etsy.
We had a few river slates left over from the masonry heater, so we’ve added some slate “shelflets” embedded into the living room walls.
Here’s one of the larger living rooms walls completed last fall, which includes gewgaws, shelflets, and a few bottle ends.
Bottle features are a striking addition to any cordwood wall. They add color and light and personality and are just all-around cool to look at. They consist of a clear glass bottle end on the outside of the wall and colored glass on the inside. In our case, all the clear glass is currently embedded in the outer wall, with a sleeve made of aluminum flashing sticking towards the interior. We just have to add the colored bottle ends as we build up the inner walls.
To do this, we had to find a way to cut the tops off of glass bottles that are too long. If you search the internet, you will find all sorts of ludicrous methods involving tile saws and candles and flaming string, but none of that is necessary (or practical). It’s really very simple, and thanks to this gentleman on youtube we found a very easy way to do the job.
You get one of these nifty glass cutting gadgets, and lightly score a complete circle around the top of the bottle.
Then you pour boiling water on the score, being careful to work your way completely around the whole bottle. We bought a cheap electric kettle to use for this.
Next, run cold water on the bottle. The glass is stressed and the top just pops right off.
We had lots of lovely bottle ends in no time.
After all that, I match them up with a clear bottle as we build. Here’s a wall in progress.
And here’s the completed bottle feature, with several different shapes and sizes and colors.
One fine day last July, we finally got started on the inner walls. Our old friend Dave Bach stopped by with his friend Mark, who was interested in cordwood, so we turned the day into an impromptu workshop. Greg mixed up some mortar, I set out some logs, and we all got to work.
We started on the south wall, which features three large window bays.
Cordwooding on the inside went rather quickly. With three people mortaring, the narrow spaces beneath the window bays started to fill in.
The next weekend we started on a larger wall. Here you can see the string lines we use to keep the wall plumb.
It’s important to have several walls going at once, so you don’t have to work at the same height in the same position all day.
As busy as we were, we could not compete with these bees outside in the garden.
Last spring we were very eager to get started building cordwood walls on the inside of the house. As is usually the case with cordwooding, there were a million and one tasks that had to be completed before we could get going. Cordwood — is it a noun, or a verb, or an adjective, anyway?
We needed more logs! There are never enough logs! The more the merrier, and the more varied your selection, the more interesting the cordwood pattern will be. So we prepped all the logs that had been drying in the kiln all winter, and chopped up lots more on the sawbuck.
Greg hooked up an outdoor spigot so we could mix mortar and water the garden.
When those trees you ordered arrive in the mail one day, you have to put them in the ground quickly.
We also spent some time trimming out a few windows and installing screens so we could start taking advantage of the warmer weather and let the fresh air into the house. It’s always amazing how quickly everything greens up when the snow melts.
We’re plumbing the house with PEX tubing rather than traditional metal pipe. No soldering is required, just a crimping tool, so it’s a whole lot easier. Greg installed a manifold, which is sort of a switching station for all the PEX tubing in the house. Blue pipes are for cold water and red pipes are for hot.
A utility sink and then a toilet followed in short order. Our work space became a whole lot more comfortable and convenient!
Because the house is well insulated and has what the energy efficiency experts call a tight envelope, it needs a special ventilation system. The ERV, or Energy Recovery Ventilator, exchanges stuffy indoor air for fresh outdoor air without cooling down the house.
All of these not very glamorous but vital tasks were carried out during the late winter and early spring of 2011. The plumbing and electrical inspectors found everything to be satisfactory. Space in the utility room is quickly filling up!
While insulating the ceiling we had to take into account areas where infrastructure such as the chimney and the plumbing vent would eventually have to get through the roof. This involved adding some extra baffles to leave openings in the insulation. We also had to run some electric wire (Romex) for overhead lighting and a ceiling fan.
By February of 2011, we were finished with the ceiling for the time being, and were working on pulling wiring through the conduit with a fish tape, and wiring the outlets. We had a few circuits live in no time.
Another important task was to cut 2x8s into base plates for the inner cordwood walls. As we spent all this time inside in the now well-insulated house, we noticed how well our passive solar design was working. On sunny days, the house warmed up and the in-floor heating kicked in rarely, if at all.
Greg struggled to connect the water heater to the in-floor heating system so we could return the rented propane heater. He did most of this during the evening hours after work. After a series of frightening misadventures which included nearly asphyxiating himself and a late night deer/truck collision, the in-floor heating was up and running. Here you can see the water heater, water tank, and the electrical panel in the utility area:
Our next major task was to insulate the roof. The walls were nice and cozy, but the roof consisted of just decking and steel. Massive heat loss caused huge icicles to form.
We cut pieces of OSB to attach to the bottom roof joists, and the resultant sixteen inch space was to be filled with blown in cellulose insulation. Installing the OSB was especially challenging in the high-ceilinged living room area, which required some heavy lifting, and work from high atop a scaffolding. For some of this, I braced the OSB with a two-by-four while Greg wielded the nail gun.
The hardware store delivered a big load cellulose insulation, which comes in rectangular plastic-wrapped bales:
To fill each course of OSB with insulation, we rented a machine called the Krendl, which grinds up the bales of cellulose and blows it out through an enormous, unwieldy corrugated plastic hose. It’s reminiscent of something from a Terry Gilliam cartoon.
It took a while to get the hang of the temperamental Krendl. We worked on the ceiling throughout December and into January of 2011, installing rows of OSB panels, filling them with insulation, and gradually working our way to the front of the house.
“What’s he building in there?
What the hell is he building in there?” -Tom Waits
As Thanksgiving weekend, 2010 approached, we knew that two important things had to happen. We needed running water inside the house, and a way to keep the temperature consistently above freezing. This had become a matter of some urgency because a contractor was coming from Duluth with his crew to build our masonry heater.
We had purchased the masonry heater kit the previous summer at the Midwest Renewable Energy Fair (as mentioned in Greg’s previous post). After wrangling the huge heavy cement blocks up to the house, we decided it would be best to leave the actual assembly to an experienced mason. Fortunately, we had also met Eric Moshier, a contractor who had built many masonry heaters using the Temp-Cast kit, at the MWREF. He was also able to cast additional parts to add a bread oven to the unit. He was willing to come out to the Keweenaw to do the job, so we scheduled the work to be done just after Thanksgiving. We selected and ordered bricks according to Eric’s directions, and collected some beautiful river slates for the masons to incorporate into the brick facade.
We needed running water inside the house. Once we had water, we could hook up the in-floor heating. We spent the better part of Black Friday on a trip down to the nearest Big Box Home Improvement Store in Iron Mountain to purchase a hot water heater. There was just one problem: locating the water line.
Back when Frank Beauchamp poured the foundation, we had him dig a trench and lay in a pipe from near the well up through the slab and into house. So, in theory, it was just a matter of digging down about six feet or so, locating the pipe, and running a water line through it from the well head to the utility room. Greg started digging at the place that had been marked with a post four years previously. And he kept digging further and further into the cold mud. No luck. Eric’s crew arrived, and Greg still hadn’t been able to locate it. It was time to improvise.
To mix their mortar, Eric’s crew collected water from the melting snow running off the roof. Our many plastic buckets were once again put to use. Greg rented a propane heater to keep the house warm enough for the mortar to cure properly. Work on the masonry heater went quickly. They put the kit together, faced it with brick, and added some slate accents.
We were certainly impressed with the results.
The propane heater had bought us bit of time, but it was vital that we get the water running and the in-floor heating system flowing. Greg called Frank, who came out with his backhoe and dug an enormous pit until he finally located that pipe. Greg and I were able to come out after work and snake a water line through the pipe into the house, and electricity from the house out to the well head. This was all very exciting to do in the pitch dark, with snow flying, giant piles of freezing mud everywhere, and a gaping pit in the ground in front of the well. Anyone observing must have wondered what on earth was going on.
“What’s he building in there?
We have a right know.”