As the days grow shorter and the sun travels much closer to the horizon, we realize it’s time once again for that festive biannual event, the tilting of the solar panels. Although we are hard at work on the interior of the house, we still have to find time to do many routine maintenance tasks. We struggled with this the first couple of times, but now have a method which takes about thirty minutes total. All it requires is a calm, windless day.
Continue reading “Changing the Angles”Chiefly Concerning the Ceiling
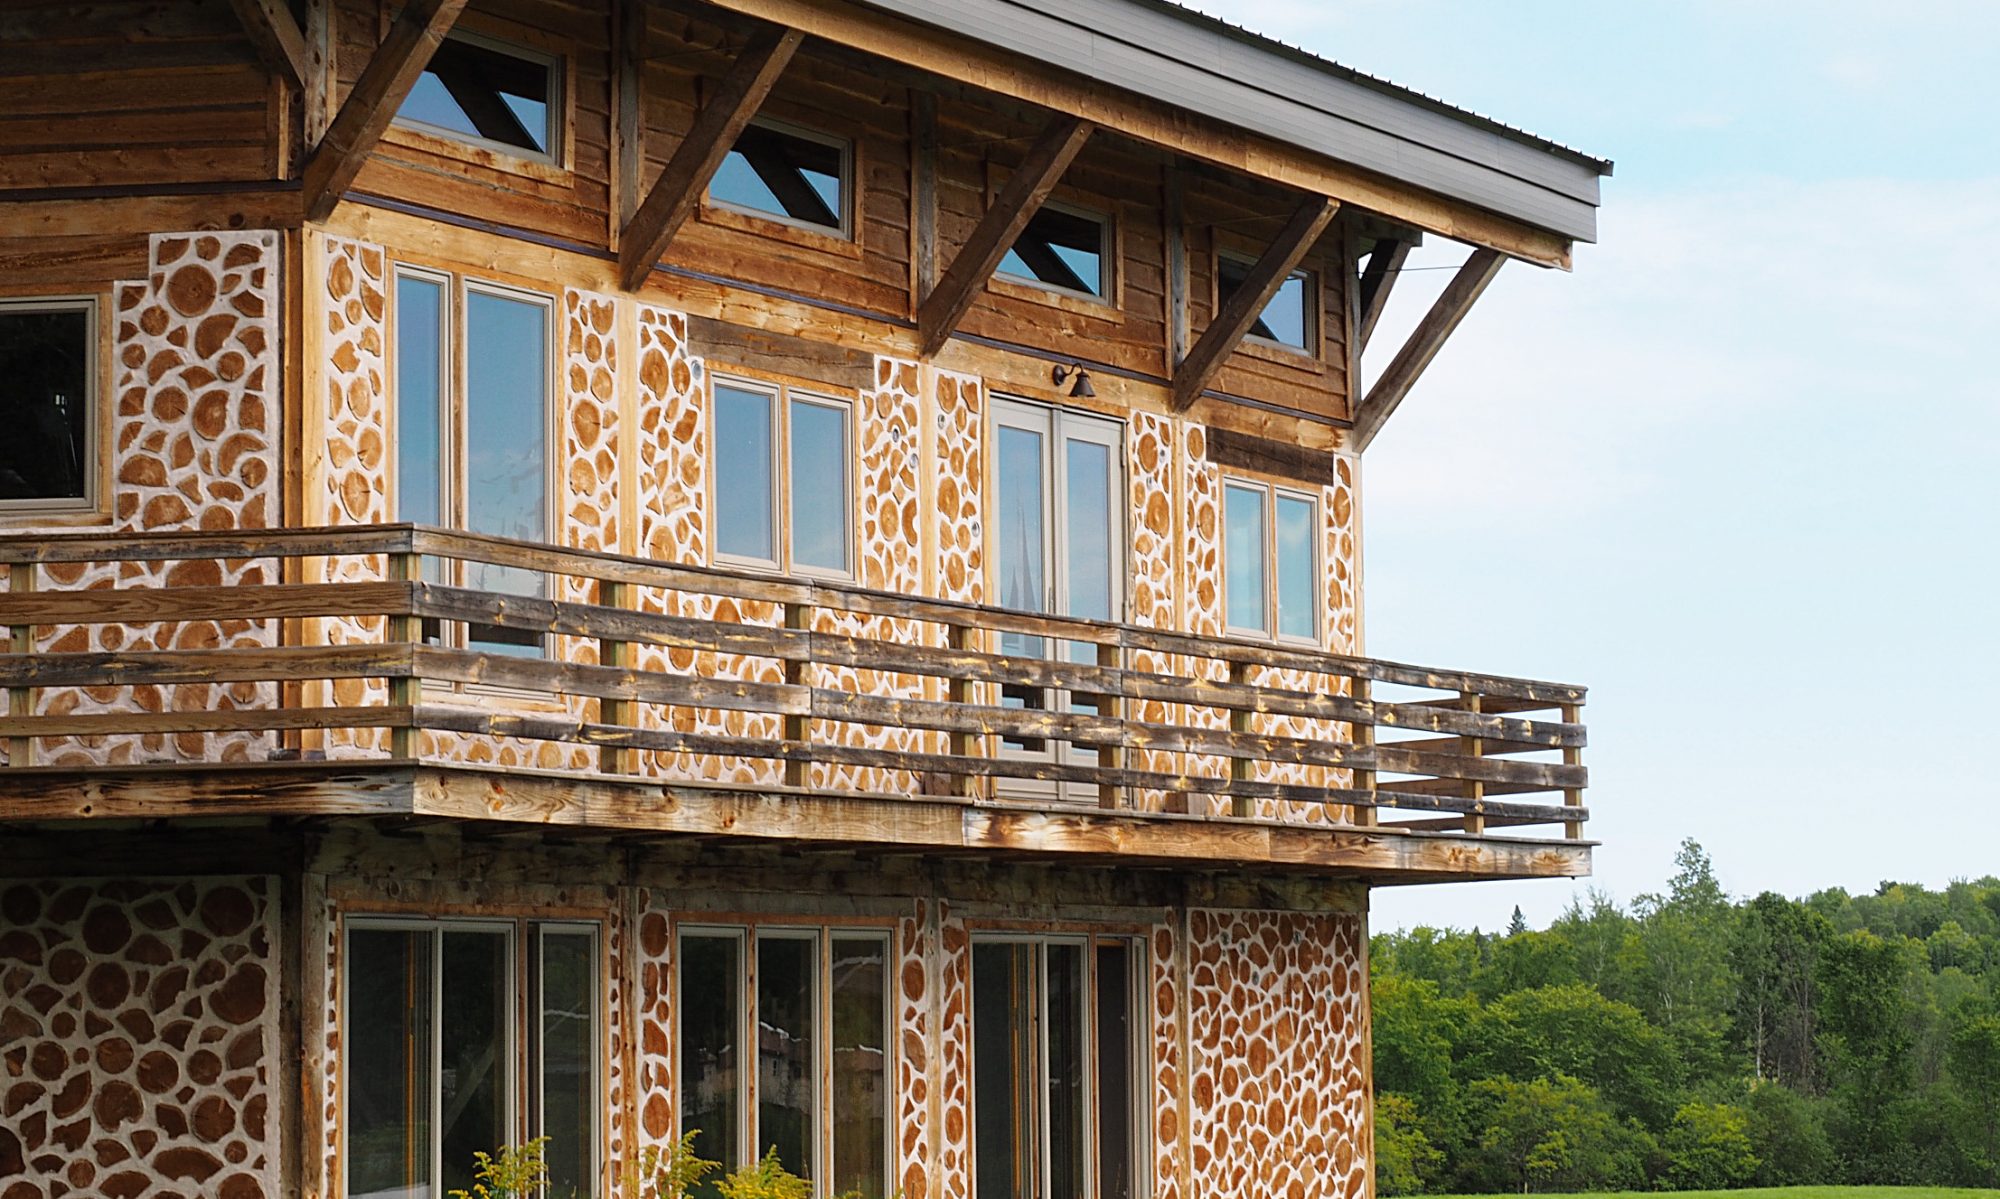
Some time during the longest February in all of recorded human history, a month in which each weekend was punctuated with an apocalyptic blizzard that made driving out to work on the house a foolhardy proposition, we received a shipment of 1000 square feet of tongue and groove aspen paneling from Keweenaw Specialty Woods. Aspen isn’t considered the most desirable type of tree to harvest around here, but we think it looks pretty good.


It very soon became apparent that this lovely stuff was not going to levitate 20 feet in the air and attach itself to the ceiling, so we had no choice but to get to work. We began on the second floor. First came a painstaking process of measuring and marking on the floor, then transferring the marks to the ceiling with the use of a laser level.

Once that was complete, any remaining gaps in the ceiling insulation were filled in with spray foam. We were then ready to lay up the first course of paneling.

The planks are nailed into the OSBÂ with a battery-powered finish nailer, a product with the rather alarming and belligerent moniker “Airstrike.” It’s extremely convenient to work with, compared to the type of nail gun powered by a hose attached to a noisy air compressor. After carefully putting up the first course as straight as possible, it was just a matter of pounding each consecutive row into place with a big rubber mallet (affectionately referred to as the BRM) and nailing it up.


There are a few details in the ceiling, such as the chimney, which require some individual shaping of the paneling with a hand saw.


Greg filled in the seams in the OSB with spackle to create a vapor barrier between the insulation in the roof and the warm air inside the house.

The aspen planks are in a variety of lengths, so we are creating a pattern of randomly alternating length, not unlike the “random rubble style” of the log ends in the cordwood walls. Before too long, it’s looking pretty sharp.


In Which We Drop Some Cordwood Science
Our cordwood construction workshop on September 21 was quite a success. Matt’s promotional skills drew in seven intrepid participants who made the journey out to Nerdwood to try their hands at mortaring up a few logs. They were a great group of people; all already had done a fair amount of research on cordwood and all had very interesting and varied backgrounds. They asked a lot of intelligent questions and worked hard. I hope they had half as much fun participating as we had hosting.
We started out with Matt giving an introduction, and on to Greg giving a talk about the house and our progress so far.

And then on to a tour of the interior of the house and some discussion of the masonry heater and some of the other features.

Greg gave a spiel about lime putty mortar and demonstrated mixing up a batch in the mixer.

We were then all set for the main event: building some cordwood walls. Off to the garden shed. I gave a brief demonstration of getting a wall started, and everyone quickly got down to business.


As you can see, these folks were naturals. By the end of the session, we had three panels halfway done. I did a little pointing demo and we wrapped up the workshop. Greg and I are looking forward to seeing some of the new cordwood projects our workshoppers are planning!
This visitor to the workshop had to be sent on his way back to the woods. Someone identified him as a Copper-bellied Snake (Nerodia erythrogaster neglecta), but after a bit of research it turns out that he was in fact a Red-bellied Snake (Storeria occipitomaculata occipitomaculata).

My Autumn’s Done Come

Ah, September in beautiful downtown Tapiola. The hay has been baled up, the vegetable garden harvest is in full swing, berry-picking season is winding down, apple picking is in the offing, and talk has begun to turn to the topic of shooting things. The weather is cool, the bugs dying off, and it’s an ideal time for a cordwood construction workshop.
The workshop is scheduled for Saturday, September 21. If participating in a hands on cordwood construction workshop sounds like something you would like to do, head right over to our good friend Matt Manders’ spiffy new website, superiorskills.net for information on how to sign up. Matt is putting it all together, Greg will be doing most of the instruction, and I will be on hand to heckle them and maybe help out. We’ll be working on the garden shed, and we hope to cover mortar mixing, wall construction, pointing, bottle ends, and cordwood best practices. If you can’t make it to this workshop, it looks like Matt has a bunch of other cool stuff coming up, so definitely check out his site if you are in or plan to be in the area this fall.
So what has been going on at Nerdwood? I realize it has been a painfully long time since I last posted. Much of what goes on is, frankly repetitious, but I will try to cover some of the salient points on future posts. We’re making good progress on the second floor interior walls.

Most of the living room is finished, and we are working our way into the second floor loft.


We hope to finish the interior walls this fall, and we’re enjoying the excellent weather while it lasts.

2012 Cordwood Year-end Wrap-up Extravaganza
So there we were, merrily whiling away the summer stacking logs and mortar, carefully aligning bottle ends, and neatly pointing the mortar. Slowly, week after week the walls went up. There was so much to do—mix putty, split and clean logs, look after the garden, mow the grass—but I couldn’t escape this nagging sensation in the back of my mind that I was forgetting something important.
It was not until over six months had passed that it dawned upon me that I was supposed to have been blogging about all this the entire time! Once again it is January, and I am woefully behind on posts. Enough with the chit-chat, let’s review our progress.
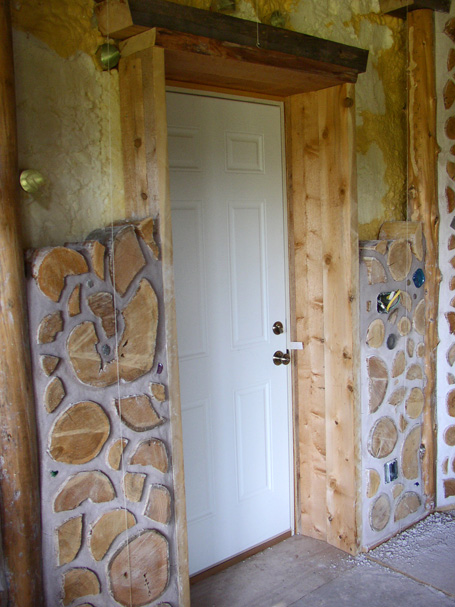
The better part of the summer and fall was devoted to finishing up the first floor. This included a panel surrounding the front door:

A panel at the very back of the house:
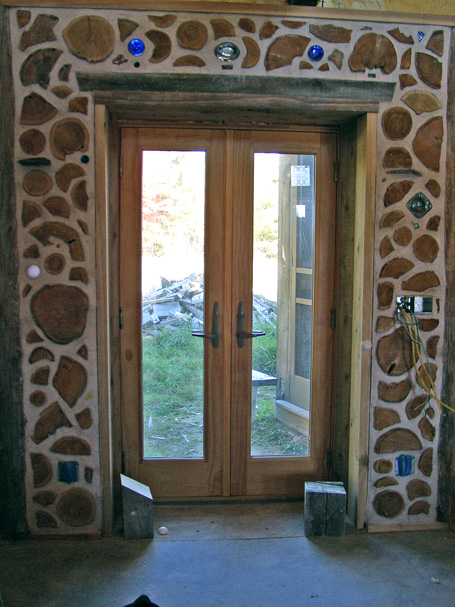
A panel surrounding the french doors:
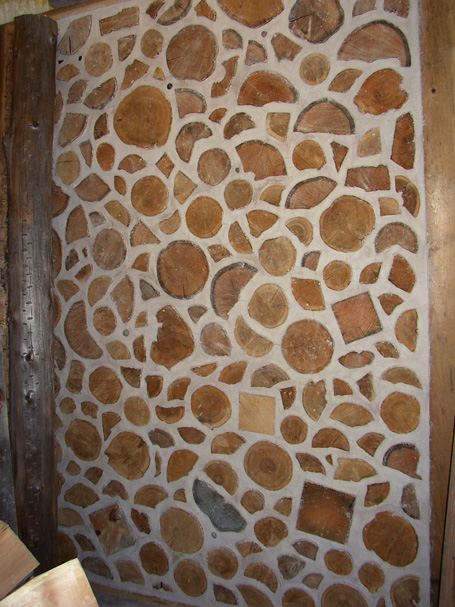
Two very large panels (“devil walls”) in the northeast corner:
And a small panel in the utility room:
Whew, that was a lot of panels. A crucial part of the process was to have several going at once, at various heights, to minimize the discomfort of having to work in the same position all day whenever possible.
By September, we were all done with the first floor. Time to cultivate a second floor mentality.
Back to Cordwood

After spending the last couple of months cutting and cleaning logs, mixing lime putty, and tidying up the place, July 4 was Opening Day of our cordwood wall building season for the year.
One of the loose ends that had to be addressed was what we have been referring to as This Whole Front Door Situation. Greg installed a temporary front door. Of course “temporary” can end up meaning a pretty long time at Nerdwood!


Greg fired up the mortar mixer, and after a couple of work days we have some very nice new walls in progress.


In Which We Acquire a Tractor

During the warmest March ever recorded in Michigan’ s Upper Peninsula, the snow melted unusually early. We used this opportunity to clean up several years worth of construction debris in preparation for the upcoming building season. Contractor bags and scrap lumber awaiting a trip to the transfer station are not very photogenic, so I will spare you the gory details.
For quite some time we have been scouring Craigslist and the local classifieds for a used tractor to help us keep up with all the chores and maintenance around the property, but nothing suitable ever came up. As luck would have it, one of my co-workers decided this spring to part with his compact tractor which was a bit over sized for his place in town, but is perfect for us novice tractor owners with acreage to tame.
The 1988 John Deere 855 came with a snow blower and a 60″ mowing deck. It can reach a blazing top speed of 11 mph. It’s not difficult to drive and handles surprisingly well. In fact, it’s a lot of fun! We should have a much easier time with many of our construction tasks now that we will not have to struggle with tall grasses and weeds all around the house.

Gewgaws and Shelflets
Despite one’s best efforts at crafting a beautiful cordwood wall with a variety of contrasting yet harmonious shapes and and sizes of log ends, it is inevitable to end up with occasional large, ungainly mortar joint. At such times, custom dictates placing a stone or interesting object in the mortar to break up the awkward space.
Rocks collected from the beach are great for this purpose, but we’ve also been working in some handmade mosaic tiles, or as we’ve been referring to them, gewgaws. There are a number of very talented artisans selling these on etsy.

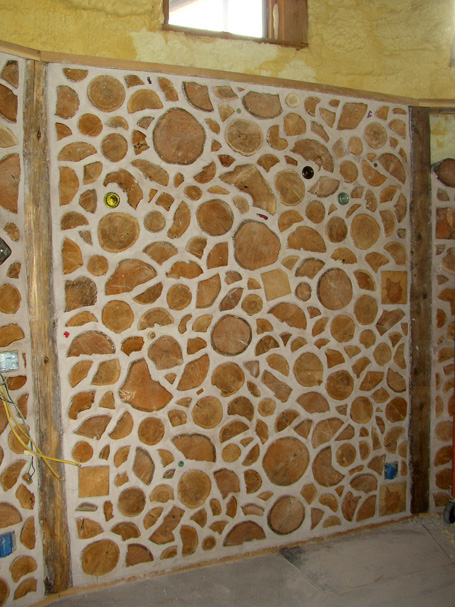
We had a few river slates left over from the masonry heater, so we’ve added some slate “shelflets” embedded into the living room walls.

Here’s one of the larger living rooms walls completed last fall, which includes gewgaws, shelflets, and a few bottle ends.

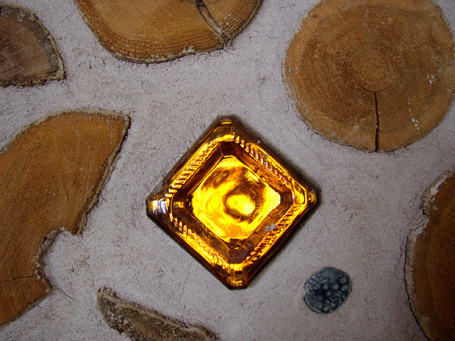
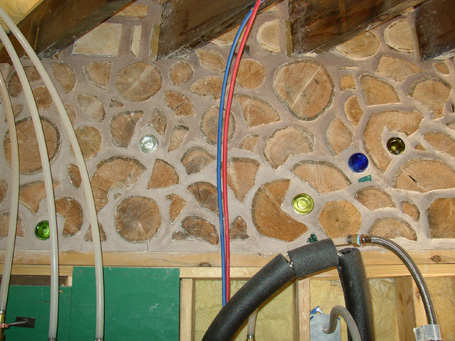
The Mysteries of Bottle-ends Revealed!
Bottle features are a striking addition to any cordwood wall. They add color and light and personality and are just all-around cool to look at. They consist of a clear glass bottle end on the outside of the wall and colored glass on the inside. In our case, all the clear glass is currently embedded in the outer wall, with a sleeve made of aluminum flashing sticking towards the interior. We just have to add the colored bottle ends as we build up the inner walls.
To do this, we had to find a way to cut the tops off of glass bottles that are too long. If you search the internet, you will find all sorts of ludicrous methods involving tile saws and candles and flaming string, but none of that is necessary (or practical). It’s really very simple, and thanks to this gentleman on youtube we found a very easy way to do the job.
You get one of these nifty glass cutting gadgets, and lightly score a complete circle around the top of the bottle.

Then you pour boiling water on the score, being careful to work your way completely around the whole bottle. We bought a cheap electric kettle to use for this.

Next, run cold water on the bottle. The glass is stressed and the top just pops right off.

We had lots of lovely bottle ends in no time.

After all that, I match them up with a clear bottle as we build. Here’s a wall in progress.

And here’s the completed bottle feature, with several different shapes and sizes and colors.

At Last, Cordwood Time Again
Since upgrading this blog a few weeks ago, I now know much more about who is reading it and what brings them here. Some of that information is a bit surprising. For example, I would not have suspected that people from Australia to Estonia hunger for blog posts about sheds. Who knew. At some point I will have to do an in-depth exposé on our shed. But I was not surprised that the overwhelming reason that people are checking in is for the cordwood. Which is really what it’s really all about! At long last we are getting back to talking cordwood, and not a moment too soon.
One fine day last July, we finally got started on the inner walls. Our old friend Dave Bach stopped by with his friend Mark, who was interested in cordwood, so we turned the day into an impromptu workshop. Greg mixed up some mortar, I set out some logs, and we all got to work.

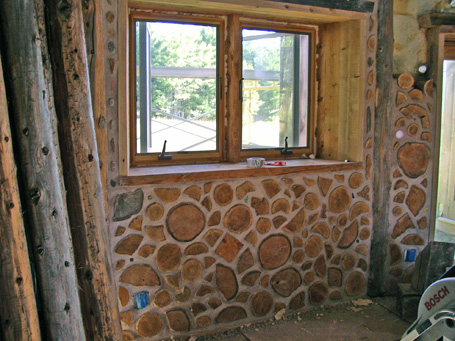
We started on the south wall, which features three large window bays.

Cordwooding on the inside went rather quickly. With three people mortaring, the narrow spaces beneath the window bays started to fill in.

The next weekend we started on a larger wall. Here you can see the string lines we use to keep the wall plumb.

It’s important to have several walls going at once, so you don’t have to work at the same height in the same position all day.

As busy as we were, we could not compete with these bees outside in the garden.
